Understanding AWS SigV4 (Signature Version 4)
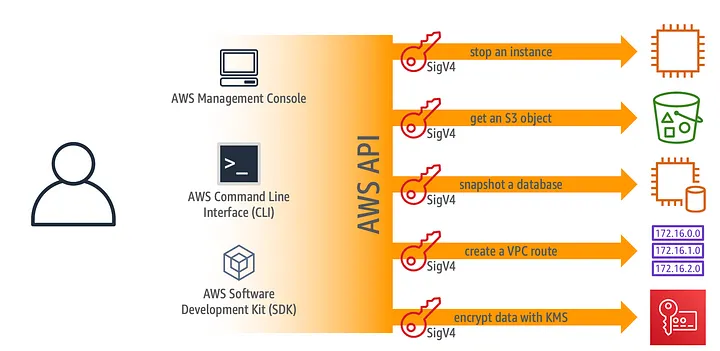
AWS Signature Version 4 (SigV4) is a process for authenticating API requests sent to AWS services. It uses cryptographic signatures to ensure the authenticity of requests and protect against tampering. When you send a request to an AWS API, you must sign it using your AWS access keys.
Why SigV4?
- Authentication: Confirms that the request is from a trusted source.
- Integrity: Ensures the request wasn’t altered while in transit.
- Replay Protection: Includes timestamped signatures to prevent replay attacks.
How AWS SigV4 Works
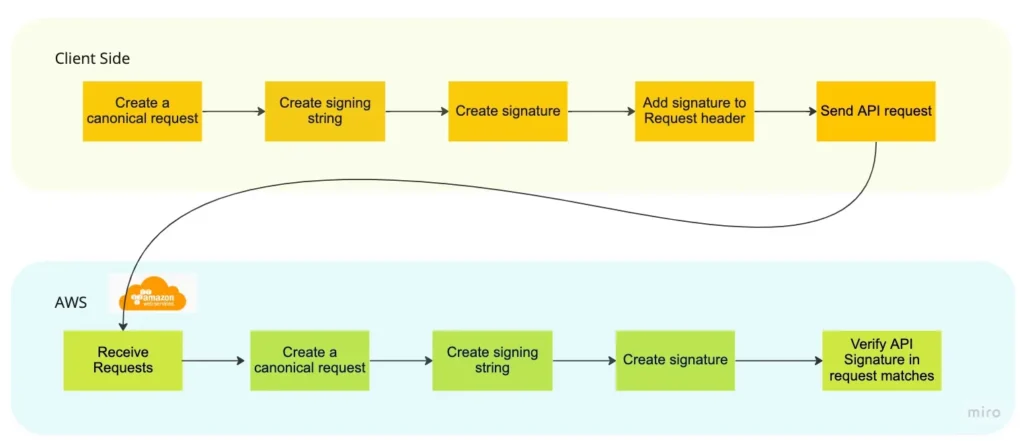
When you send a request to an AWS service, you follow these steps to sign it:
- Create a Canonical Request:
- Sort headers and parameters in a specific way.
- Hash the payload (if any) and request.
- Create a String to Sign:
- Includes information about the request and AWS credentials.
- Calculate the Signature:
- Use your AWS secret key to create a cryptographic signature using the SHA-256 algorithm.
- Send the Signed Request:
- Attach the signature to the request in the Authorization header.
Example 1: Signing a Simple HTTP Request with Python
Below is an example of how to sign a GET request using SigV4 in Python with the boto3 library. You can also do this manually using the requests library.
Python Example (Manual Signing):
import hashlib
import hmac
import requests
from datetime import datetime

def sign(key, msg):
    return hmac.new(key, msg.encode('utf-8'), hashlib.sha256).digest()

def get_signature_key(key, date_stamp, region_name, service_name):
    k_date = sign(('AWS4' + key).encode('utf-8'), date_stamp)
    k_region = sign(k_date, region_name)
    k_service = sign(k_region, service_name)
    k_signing = sign(k_service, 'aws4_request')
    return k_signing

# Credentials
access_key = 'YOUR_ACCESS_KEY'
secret_key = 'YOUR_SECRET_KEY'
region = 'us-west-2'
service = 's3'
host = 's3.amazonaws.com'

# Canonical Request details
method = 'GET'
canonical_uri = '/bucket-name'
canonical_querystring = ''
canonical_headers = 'host:' + host + '\n'
signed_headers = 'host'
payload_hash = hashlib.sha256(b'').hexdigest()

# Creating the timestamp
t = datetime.utcnow()
amz_date = t.strftime('%Y%m%dT%H%M%SZ')
date_stamp = t.strftime('%Y%m%d')

# Create the canonical request
canonical_request = method + '\n' + canonical_uri + '\n' + canonical_querystring + '\n' + canonical_headers + '\n' + signed_headers + '\n' + payload_hash

# Create the string to sign
algorithm = 'AWS4-HMAC-SHA256'
credential_scope = date_stamp + '/' + region + '/' + service + '/aws4_request'
string_to_sign = algorithm + '\n' + amz_date + '\n' + credential_scope + '\n' + hashlib.sha256(canonical_request.encode('utf-8')).hexdigest()

# Sign the string
signing_key = get_signature_key(secret_key, date_stamp, region, service)
signature = hmac.new(signing_key, string_to_sign.encode('utf-8'), hashlib.sha256).hexdigest()

# Create the authorization header
authorization_header = algorithm + ' Credential=' + access_key + '/' + credential_scope + ', SignedHeaders=' + signed_headers + ', Signature=' + signature

# Sending the request
headers = {'x-amz-date': amz_date, 'Authorization': authorization_header}
response = requests.get('https://s3.amazonaws.com/bucket-name', headers=headers)

print(response.status_code)
Using Burp Suite AWS Signer Extension
If you’re doing web application penetration testing and need to sign requests, the AWS Signer extension for Burp Suite is commonly used to apply SigV4 signing automatically.
Setting Up AWS Signer in Burp Suite
- Install AWS Signer:
- Go to the Burp Suite extension store and search for “AWS Signer.”
- Install it, and configure your AWS access key and secret key.
- Configuring AWS Signer:
- Go to the extension’s configuration screen.
- Set the Service Name (e.g.,
s3,execute-api). - Set the Region (e.g.,
us-west-2).
- Enable the Extension:
- Enable AWS Signer on the request tab, and it will sign the request automatically.
Example 2: Signing Requests with AWS Signer in Burp Suite
- Step 1: Intercept a request.
- Step 2: In the extension panel, ensure the correct AWS credentials, service name, and region are configured.
- Step 3: Send the request. AWS Signer will append the necessary headers, including
x-amz-date,Authorization, andx-amz-content-sha256.
Example 3: Testing API Requests with AWS Signer
Consider testing an API endpoint using AWS Signer. Here’s how to test it:
- Step 1: Intercept an API call (for example, to AWS Lambda or API Gateway).
- Step 2: Set up AWS Signer to match the API’s service (e.g.,
execute-apifor API Gateway). - Step 3: Modify the parameters or payload to fuzz or test the API, and AWS Signer will sign the request accordingly.
For example, if you are testing an API Gateway endpoint:
POST /dev/api/resource HTTP/1.1
Host: api-id.execute-api.us-west-2.amazonaws.com
Content-Type: application/json
x-amz-date: 20231019T000000Z
Authorization: AWS4-HMAC-SHA256 Credential=ACCESS_KEY/... Signature=...

{
  "example": "data"
}
The AWS Signer will ensure this request is signed correctly, allowing you to test authenticated endpoints without manually calculating the signature.
Key Points to Remember
- Always use temporary credentials during pentests to avoid potential credential leaks.
- Ensure your region and service names are correct when configuring the AWS Signer extension.
- Leverage Burp Suite’s capabilities to automate API testing while maintaining SigV4 authentication.
Conclusion
Mastering AWS SigV4 is essential for any pentester working on AWS services. By using tools like Burp Suite’s AWS Signer, you can automate much of the signing process, allowing you to focus on testing and exploiting vulnerable APIs efficiently.